Crocheted Teddy Bear with Heart
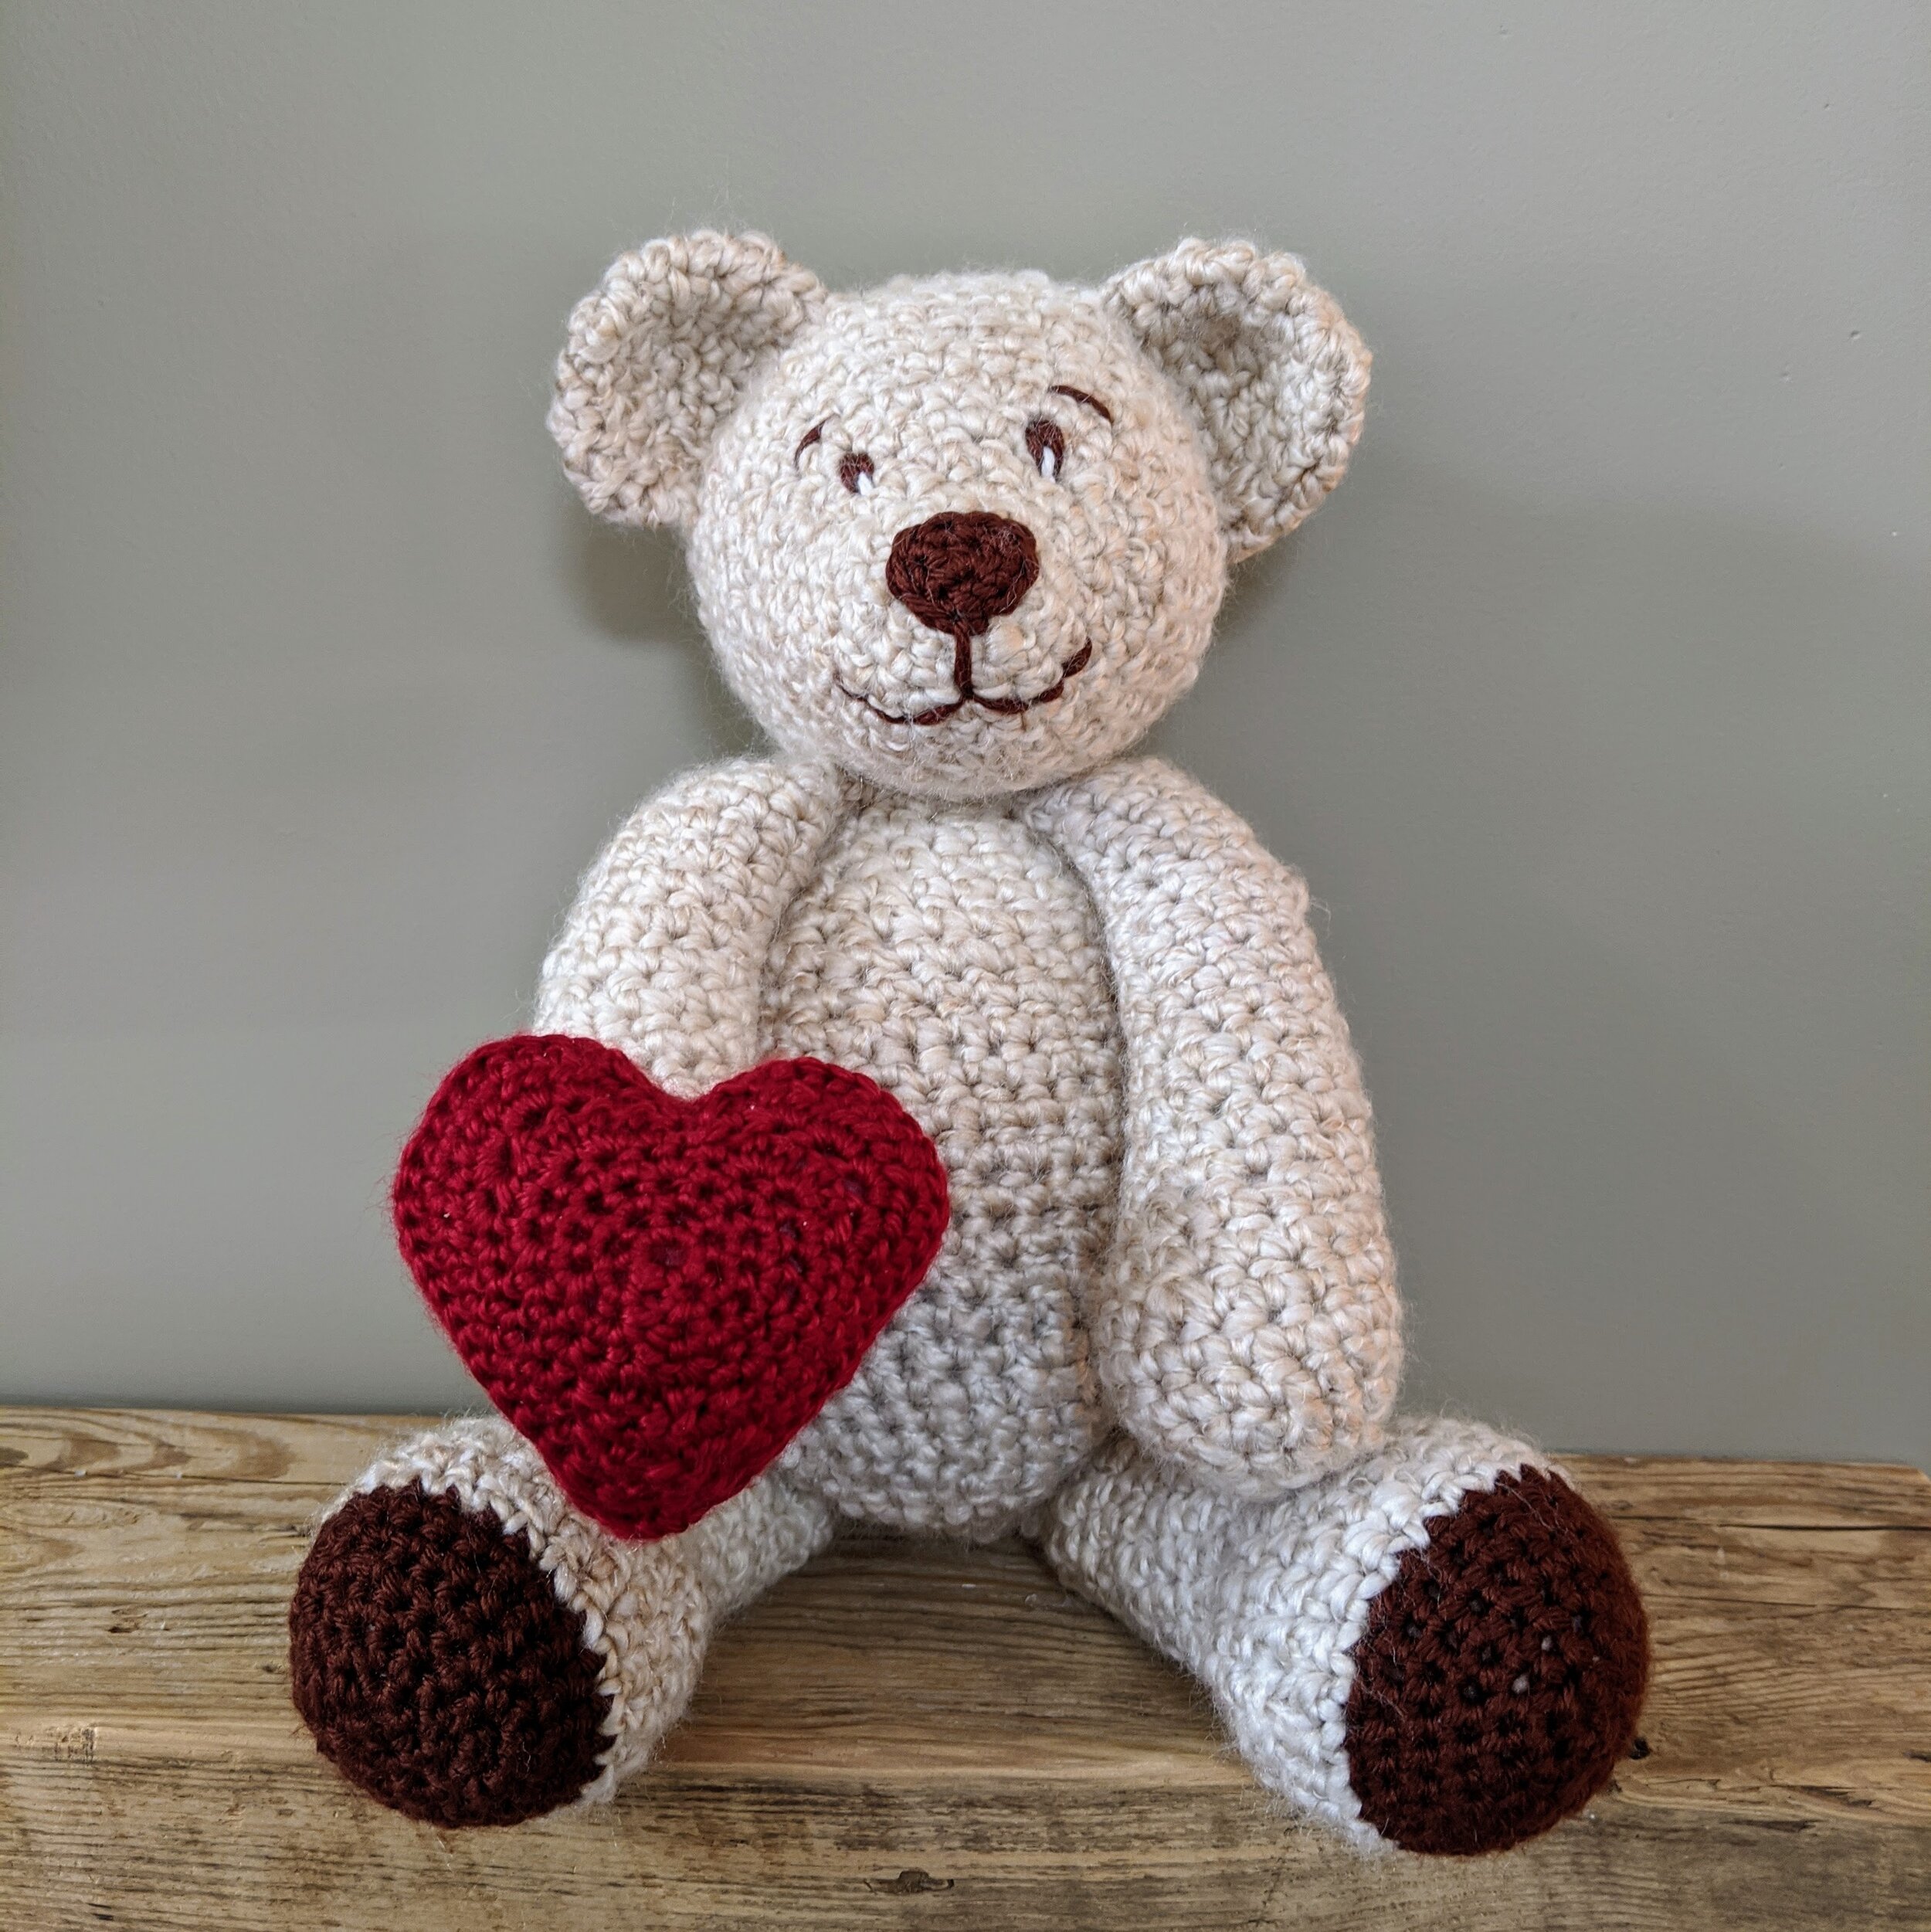
Over the past few weeks, I’ve been thinking a lot about creative ways that we can express our care and love for friends and family. What better way to show we are thinking of someone, than to make an adorable, heart-holding teddy bear!
The teddy bear makes a great gift for Valentine’s Day, Mother’s Day, birthdays or to just let someone know that you are thinking of them. I’ve also included the pattern for the removable heart that the teddy bear can hold to send that extra signal of love.
MATERIALS
Crochet Hooks: J/6.00mm; H/5.00mm - This is my favorite crochet hook and yarn needle set I got from WooCrafts. The set is really affordable and comes with 9 different-sized crochet hooks, 8 yarn needles, stitch markers and a cute carrying case.
Yarn: ~225 yds Bulky weight yarn for creating the bear in tan color - I used about 1.5 skeins of Lion Brand Homespun Pearls; I like this yarn as it hides the stitches and looks like fur!
Medium weight yarn in dark brown for paws and facial features - I used Canon Simply Soft
Medium weight yarn in Red - I used Canon Simply Soft (optional for the heart)
Poly-fil or other stuffing
Yarn or tapestry needle
Scissors
ABBREVIATIONS
Ch = chain
Sl st = slip stitch
sc = single crochet
hdc = half double crochet
dc = double crochet
tr = treble crochet
scd = single crochet decrease; I use the crochet two stitches together decrease method
MR = magic ring - find a great tutorial here
Teddy Bear Instructions
Size
One size: the finished teddy is ~9” tall when seated
Teddy Bear Head
Gauge: Using size J hook, gauge is 6 sts and 6 rows = 2” x 2”
The head is crocheted in continuous rounds. Be sure to stuff the head, and all other pieces with Poly-fil as you go.
Rd 1: MR 6 sc
Rd 2: 2 sc, SC, SC, 2 sc, SC, SC (8)
Rd 3: *2 sc, SC in next 3* (10)
Rd 4: *2 sc, SC in next 4* (12)
Rd 5: *2 sc, SC in next 3* (15)
Rd 6: Sc in next 3, *2sc, SC* repeat 3 more times, 2sc, SC in next 3 (20)
Rd 7: Sc in next 5, *2sc, sc* repeat 4 more times, SC in next 5 (25)
Rd 8: Sc in next 6, *2sc, SC,SC* repeat 3 more times, 2sc, SC in next 6 (30)
Rd 9: Sc in each (30)
Rd 10: Sc in next 10, 2sc, 2, 2sc, 2, 2sc, 2, 2sc, SC in next 10 (34)
Rd 11: Sc in next 11, 2sc, SC in next 10, 2sc, SC in next 11 (36)
Rd 12-17: Sc in each (36) for 6 rows
Rd 18: *Scd, SC in next 4* repeat to end of round (30)
Rd 19: *Scd, SC in next 3* repeat to end of round (24)
Rd 20: *Scd, SC in next 2* repeat to end of round (18)
Rd 21: *Scd, SC in next 1* repeat to end of round (12)
Rd 22: Scd, repeat to end of round (6)
With yarn needle, cut long tail then weave through remaining 6 sts, pull tight to close, bind off, weave in ends.
Nose
Row 1: Chain 5
Row 2: Hdc in second chain from the hook, hdc in each of remaining 3 sts, ch1, turn (4 hdc sts)
Row 3: scd, scd, ch 1, turn (2 sc sts)
Row 4: scd, ch1, then sc around the entire perimeter of the nose, being sure to do 2 sc in corner stitches, sl to join at the bottom of the nose; bind off, leaving long tail to stitch nose onto the hat and sew on mouth.
Ears
Make two:
Rd 1: MR 8 SC
Rd 2: *Sc, 2sc* repeat to end of round (12)
Rd 3: *Sc in next 5, 2sc* repeat (14)
Rd 4: Sc in each around
Rd 5: Sc in each around, sl to join, bind off leaving long tail to stitch the ear onto the hat.
Fold ear in half and shape as desired.
Body
Rd 1: MR 6, do not join, prepare to continue in spiral
Rd 2: 2 sc in each around (12)
Rd 3: *2 sc, SC* repeat around (18)
Rd 4: *2 sc, SC in next 2* repeat around (24)
Rd 5: *2 sc, SC in next 3* repeat around (30)
Rd 6: *2 sc, SC in next 4* repeat around (36)
Rd 7: SC in each around
Rd 8: *2 sc, SC in next 11* repeat around (39)
Rd 9 - 20: SC in each around
Rd 21: SC 10, scd, scd, scd, SC 7, scd, scd, scd, SC 10 (33)
Rd 22: SC in each around
Rd 23: SC 10, scd, scd, SC 5, scd, scd, SC 10 (29)
Rd 24: SC in each around
Rd 25: *scd, SC in next 4* repeat around (24)
Rd 26: SC in each around
Rd 27: *scd, SC in next 2* repeat around (18)
Rd 28: *scd* repeat around (9), sl st in 1st St of round, bind off leaving long tail to sew body onto head.
Arm
Make two:
Rd 1: Mr 6, do not join, prepare to continue in spiral
Rd 2: 2 sc in each around (12)
Rd 3: *2 sc, SC in next 2* repeat around (16)
Rd 4: *2 SC, SC 7* repeat around (18)
Rd 5-7: SC in each around
Rd 8: SC 6, scd, scd, scd, SC 6 (15)
Rd 9-11: SC around
Rd 12: SC 6, scd, SC 7 (14)
Rd 13: SC around
Rd 14: SC 6, scd, SC 6 (13)
Rd 15: SC around
Rd 16: SC 6, scd, SC 5 (12)
Rd 17-19: SC around
Rd: 20: *scd, SC* repeat around (8)
Rd 21: SC around, sl to join, bind off.
Finish stuffing the arm, then pinch the top of the arm closed flat (~4 sts on each side) and using the working yarn, stitch the top of the arm closed. Bind off and cut leaving a long tail to attach the arm to body.
Leg
Make two:
Rd 1: with dark brown yarn and size J hook, MR 6, do not join, prepare to continue in spiral
Rd 2: 2 sc in each around (12)
Rd 3: *2 sc in next, then SC* repeat around (18)
Rd 4: *2 sc in next, then SC in next 2 sts* repeat around (24)
Rd 5-6: sc in each around
Rd 7: change to tan yarn (main color), sl st in first st of round then SC in each st around
Rd 8-10: SC in each around
Rd 11: SC 8, scd 4 times, SC 8 (20)
Rd 12: SC 8, scd twice, SC 8 (18)
Rd 13-18: SC in each around
Rd 19: SC 8, scd, SC 8 (17)
Rd 20-21: SC in each around
Rd 22: SC 7, scd, SC 8 (16)
Rd 23: SC in each around
Rd 24: sl 8, SC 8, sl st into first stitch of round, turn
Rd 25 (working in opposite direction across the sts you just created): sl st, SC 6, sl st, turn
Rd 26: sl in most recent SC created, SC 4, sl st into last SC st in row. Bind off.

Assemble the Bear
Assemble the Head
Nose and mouth: Using yarn needle, sew the nose onto the head in the position as shown in the photos. Using the same working yarn, stitch the mouth in place. Tie off and tuck in ends.
Eyes: Using a new piece of dark brown yarn, sew the eyes in place. Eyes are placed at approximately row 7 of the head about 5 stitches apart. Feel free to adjust eye position as suits your tastes.
Optional: using thin white yarn, stitch the pupil of the eye in place.
Ears: using the yarn needle and long tail of yarn attached to the ear, sew the ear in place on the head as positioned in the photos. The front of the ear should be positioned at approximately row 13 of the head, and the ears should be placed about 7 stitches apart.

Attach to the Body
Attach the arms: Using the yarn needle and long tail of yarn on the arm sew the arms onto the body. The top of the arm should line up with second row of stitches from the opening at the top of the body. Tie off and weave in ends. Repeat with the second arm.
Attach the head: Using the long tail of yarn from the body, stitch the head onto the body. The fattest part of the back of the head should pretty much line up with the fattest part of the back of the body. I recommend stitching twice around so that the head doesn’t wobble. Tie off and weave in ends.
Attach the legs: Using the yarn needle and long tail of yarn attached to the legs, stitch the leg onto the body. The leg should be positioned so that the taller edge is facing out and the shorter edge is near the groin. The top part of the outer side of the leg is positioned ~8 rounds up from the bottom of the body. The lowest part of the leg opening is positioned at ~round 3 of the body. Feel free to adjust the position of the legs to suit your tastes.

Optional Heart Accessory
Heart pattern (make 2):
Rd 1: Using size H hook and red yarn, MR 7 SC, sl to join, ch1 (7 sts)
Rd 2: SC in each around, sl to join, ch1 (14)
Rd 3: 2 SC, SC, sl to join, ch1 - repeat around (21)
Rd 4: dc, hdc, 2 SC, SC, SC, 2 SC, hdc, 2 DC, 2 DC, hdc, sl, hdc, 2 DC, 2 DC, hdc, 2 SC, SC, SC, 2 SC, SC, SC, sl to join, ch2 (29)
Rd 5: DC, hdc, sc, 2 SC, SC in next 4, 2 hdc, 3 hdc, 3 hdc, 3 hdc, hdc, sl, sl, sl, hdc, 3 hdc, 3 hdc, 3 hdc, 2 hdc, SC in next 4, 2 SC, sc, hdc, DC, sl to join, ch2 (45)
Rd 6: DC, hdc, SC in next 9, 2 SC, SC in next 3, 2 SC, SC in next 3, sl in next 7, SC in next 3, 2 SC, SC in next 3, 2 SC, SC in next 9, hdc, DC, sl to join
For the first heart, after you finish rd 6, tie off, cut and weave in ends.
For the second hear, after you finish rd 6, tie off, and cut leaving a very long tail (~1 yard) that you will use to sew the two hearts together. Hold the two hearts together, then using your yarn needle, sew the two pieces together by slip stitching around the entire perimeter. When you have ~6 sts left, stuff the heart with poly-fil stuffing to desired firmness, then finish slip stitching to close. Tie off.
Create chain bracelet to attach heart to bear’s hand: Continuing to work with your long tail yarn and needle - insert the needle into the bottom tip of the heart and have it emerge through the back center of the heart. Switching back to you size H crochet hook chain ~34 sts - or desired number to form a bracelet that will fit around the teddy’s hand. Slip stitch into the first stitch in the chain to join. Tie off and weave in ends. Place the bracelet over the teddy’s hand so that he is holding the heart.


***You may make and sell products from my patterns but if you do I ask that you link back to my post. Please do not copy and post this pattern and claim it as your own, or attempt to sell this pattern. Please do not re-publish photos as your own.