Crochet Monkey Hat Pattern
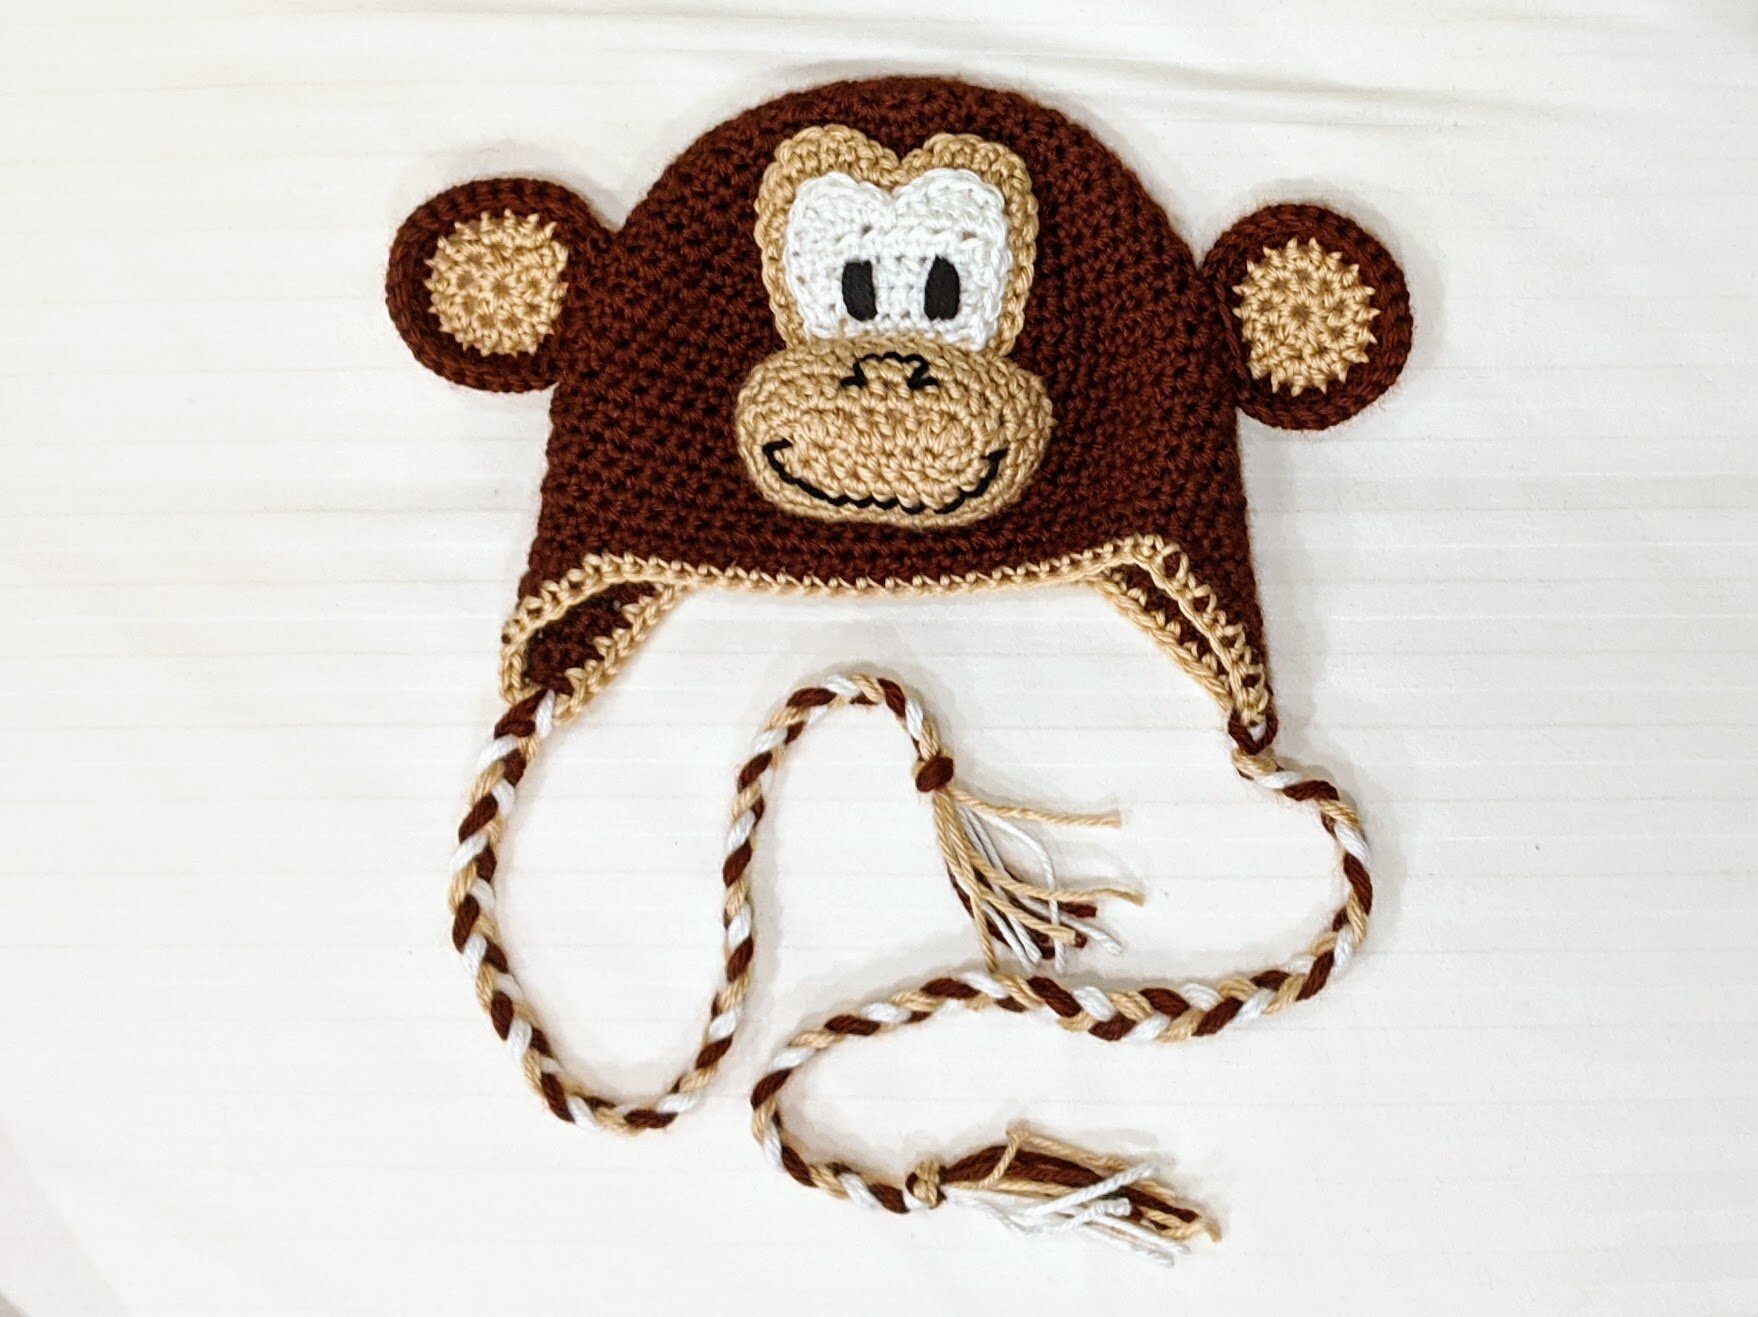
Nothing makes me smile like babies and kids wearing animal hats, and what better animal to capture the spirit of the rambunctious little one in your life than a monkey! I’ve seen a few monkey hat patterns on the web, but none of them quite captured the 3-dimensional look I wanted so I decided to create the pattern below. I hope you enjoy it!
Materials:
Size H crochet hook
Worsted weight yarn in dark brown (A), beige (B), and scrap amounts of white (C) and black (D)
Yarn or tapestry needle
Scissors
Abbreviations:
Ch = chain
Sl st = slip stitch
SC = single crochet
SCD = single crochet decrease
HDC = half double crochet
DC = double crochet
TR = treble crochet
MR = magic ring - find a great tutorial here
Hat Instructions
Size: up to 6 months
Magic ring, 10 DC in magic ring, join to first DC, chain 2
Round 2: 2 DC in each around, join, chain 2 (20 DC)
Round 3: *2 DC in first, DC in next*, repeat around, join, chain 2 (30 DC)
Round 4: *2 DC in first, DC in next 2*, repeat around, join, chain 2 (40 DC)
Round 5: *2 DC in first, DC in next 9*, repeat around, join, chain 2 (44 DC)
Round 6: *2 DC in first, DC in next 10*, repeat around, join, chain 2 (48 DC)
Round 7-12: DC in each around, join, chain 2
Do not fasten off, begin on earflap - see pattern below
Size: 6-9 months
Magic ring, 10 DC in magic ring, join to first DC, chain 2
Round 2: 2 DC in each around, join, chain 2 (20 DC)
Round 3: *2 DC in first, DC in next*, repeat around, join, chain 2 (30 DC)
Round 4: *2 DC in first, DC in next 2*, repeat around, join, chain 2 (40 DC)
Round 5: *2 DC in first, DC in next 9*, repeat around, join, chain 2 (44 DC)
Round 6: *2 DC in first, DC in next 10*, repeat around, join, chain 2 (48 DC)
Round 7: *2 DC in first, DC in next 11*, repeat around, join, chain 2 (52 DC)
Round 8-13: DC in each around, join, chain 2
Do not fasten off, begin on earflap - see pattern below
Size: 9-12 months
Magic ring, 10 DC in magic ring, join to first DC, chain 2
Round 2: 2 DC in each around, join, chain 2 (20 DC)
Round 3: *2 DC in first, DC in next*, repeat around, join, chain 2 (30 DC)
Round 4: *2 DC in first, DC in next 2*, repeat around, join, chain 2 (40 DC)
Round 5: *2 DC in first, DC in next 9*, repeat around, join, chain 2 (44 DC)
Round 6: *2 DC in first, DC in next 10*, repeat around, join, chain 2 (48 DC)
Round 7: *2 DC in first, DC in next 11*, repeat around, join, chain 2 (52 DC)
Round 8: *2 DC in first, DC in next 12*, repeat around, join, chain 2 (56 DC)
Round 9-13: DC in each around, join, chain 2
Do not fasten off; begin on earflap - see pattern below
Size: 18 months - ~4 years
Magic ring, 10 DC in magic ring, join to first DC, chain 2
Round 2: 2 DC in each around, join, chain 2 (20 DC)
Round 3: *2 DC in first, DC in next*, repeat around, join, chain 2 (30 DC)
Round 4: *2 DC in first, DC in next 2*, repeat around, join, chain 2 (40 DC)
Round 5: *2 DC in first, DC in next 9*, repeat around, join, chain 2 (44 DC)
Round 6: *2 DC in first, DC in next 10*, repeat around, join, chain 2 (48 DC)
Round 7: *2 DC in first, DC in next 11*, repeat around, join, chain 2 (52 DC)
Round 8: *2 DC in first, DC in next 12*, repeat around, join, chain 2 (56 DC)
Round 9: *2 DC in first, DC in next 13*, repeat around, join, chain 2 (60 DC)
Round 10-14: DC in each around, join, chain 2
Do not fasten off; begin on earflap - see pattern below
Size: 5 - 10 years old
Magic ring, 10 DC in magic ring, join to first DC, chain 2
Round 2: 2 DC in each around, join, chain 2 (20 DC)
Round 3: *2 DC in first, DC in next*, repeat around, join, chain 2 (30 DC)
Round 4: *2 DC in first, DC in next 2*, repeat around, join, chain 2 (40 DC)
Round 5: *2 DC in first, DC in next 9*, repeat around, join, chain 2 (44 DC)
Round 6: *2 DC in first, DC in next 10*, repeat around, join, chain 2 (48 DC)
Round 7: *2 DC in first, DC in next 11*, repeat around, join, chain 2 (52 DC)
Round 8: *2 DC in first, DC in next 12*, repeat around, join, chain 2 (56 DC)
Round 9: *2 DC in first, DC in next 13*, repeat around, join, chain 2 (60 DC)
Round 10: *2 DC in first, DC in next 14*, repeat around, join, chain 2 (64 DC)
Round 11-15: DC in each around, join, chain 2
Do not fasten off; begin on earflap - see pattern below
Size: teen/adult
Magic ring, 10 DC in magic ring, join to first DC, chain 2
Round 2: 2 DC in each around, join, chain 2 (20 DC)
Round 3: *2 DC in first, DC in next*, repeat around, join, chain 2 (30 DC)
Round 4: *2 DC in first, DC in next 2*, repeat around, join, chain 2 (40 DC)
Round 5: *2 DC in first, DC in next 9*, repeat around, join, chain 2 (44 DC)
Round 6: *2 DC in first, DC in next 10*, repeat around, join, chain 2 (48 DC)
Round 7: *2 DC in first, DC in next 11*, repeat around, join, chain 2 (52 DC)
Round 8: *2 DC in first, DC in next 12*, repeat around, join, chain 2 (56 DC)
Round 9: *2 DC in first, DC in next 13*, repeat around, join, chain 2 (60 DC)
Round 10: *2 DC in first, DC in next 14*, repeat around, join, chain 2 (64 DC)
Round 11: *2 DC in first, DC in next 15*, repeat around, join, chain 2 (68 DC)
Round 12-16: DC in each around, join, chain 2
Do not fasten off; begin on earflap - see pattern below
Earflap Pattern
Row 1: ch1, SC in next 10, ch1, turn (10 SC)
Row 2: SCD, SC in next 6, SCD, ch1, turn (8 SC)
Row 3: SC in next 8, ch1, turn (8 SC)
Row 4: SCD, SC in next 4, SCD, ch1, turn (6 SC)
Row 5: SC in next 6, ch1, turn (6 SC)
Row 6: SCD, SC in next 2, SCD, ch1, turn (4 SC)
Row 7: SC in next 4, ch1, turn (4 SC)
Row 8: SCD, SCD, ch1, turn (2 SC)
Row 9: SCD, fasten off, weave in ends
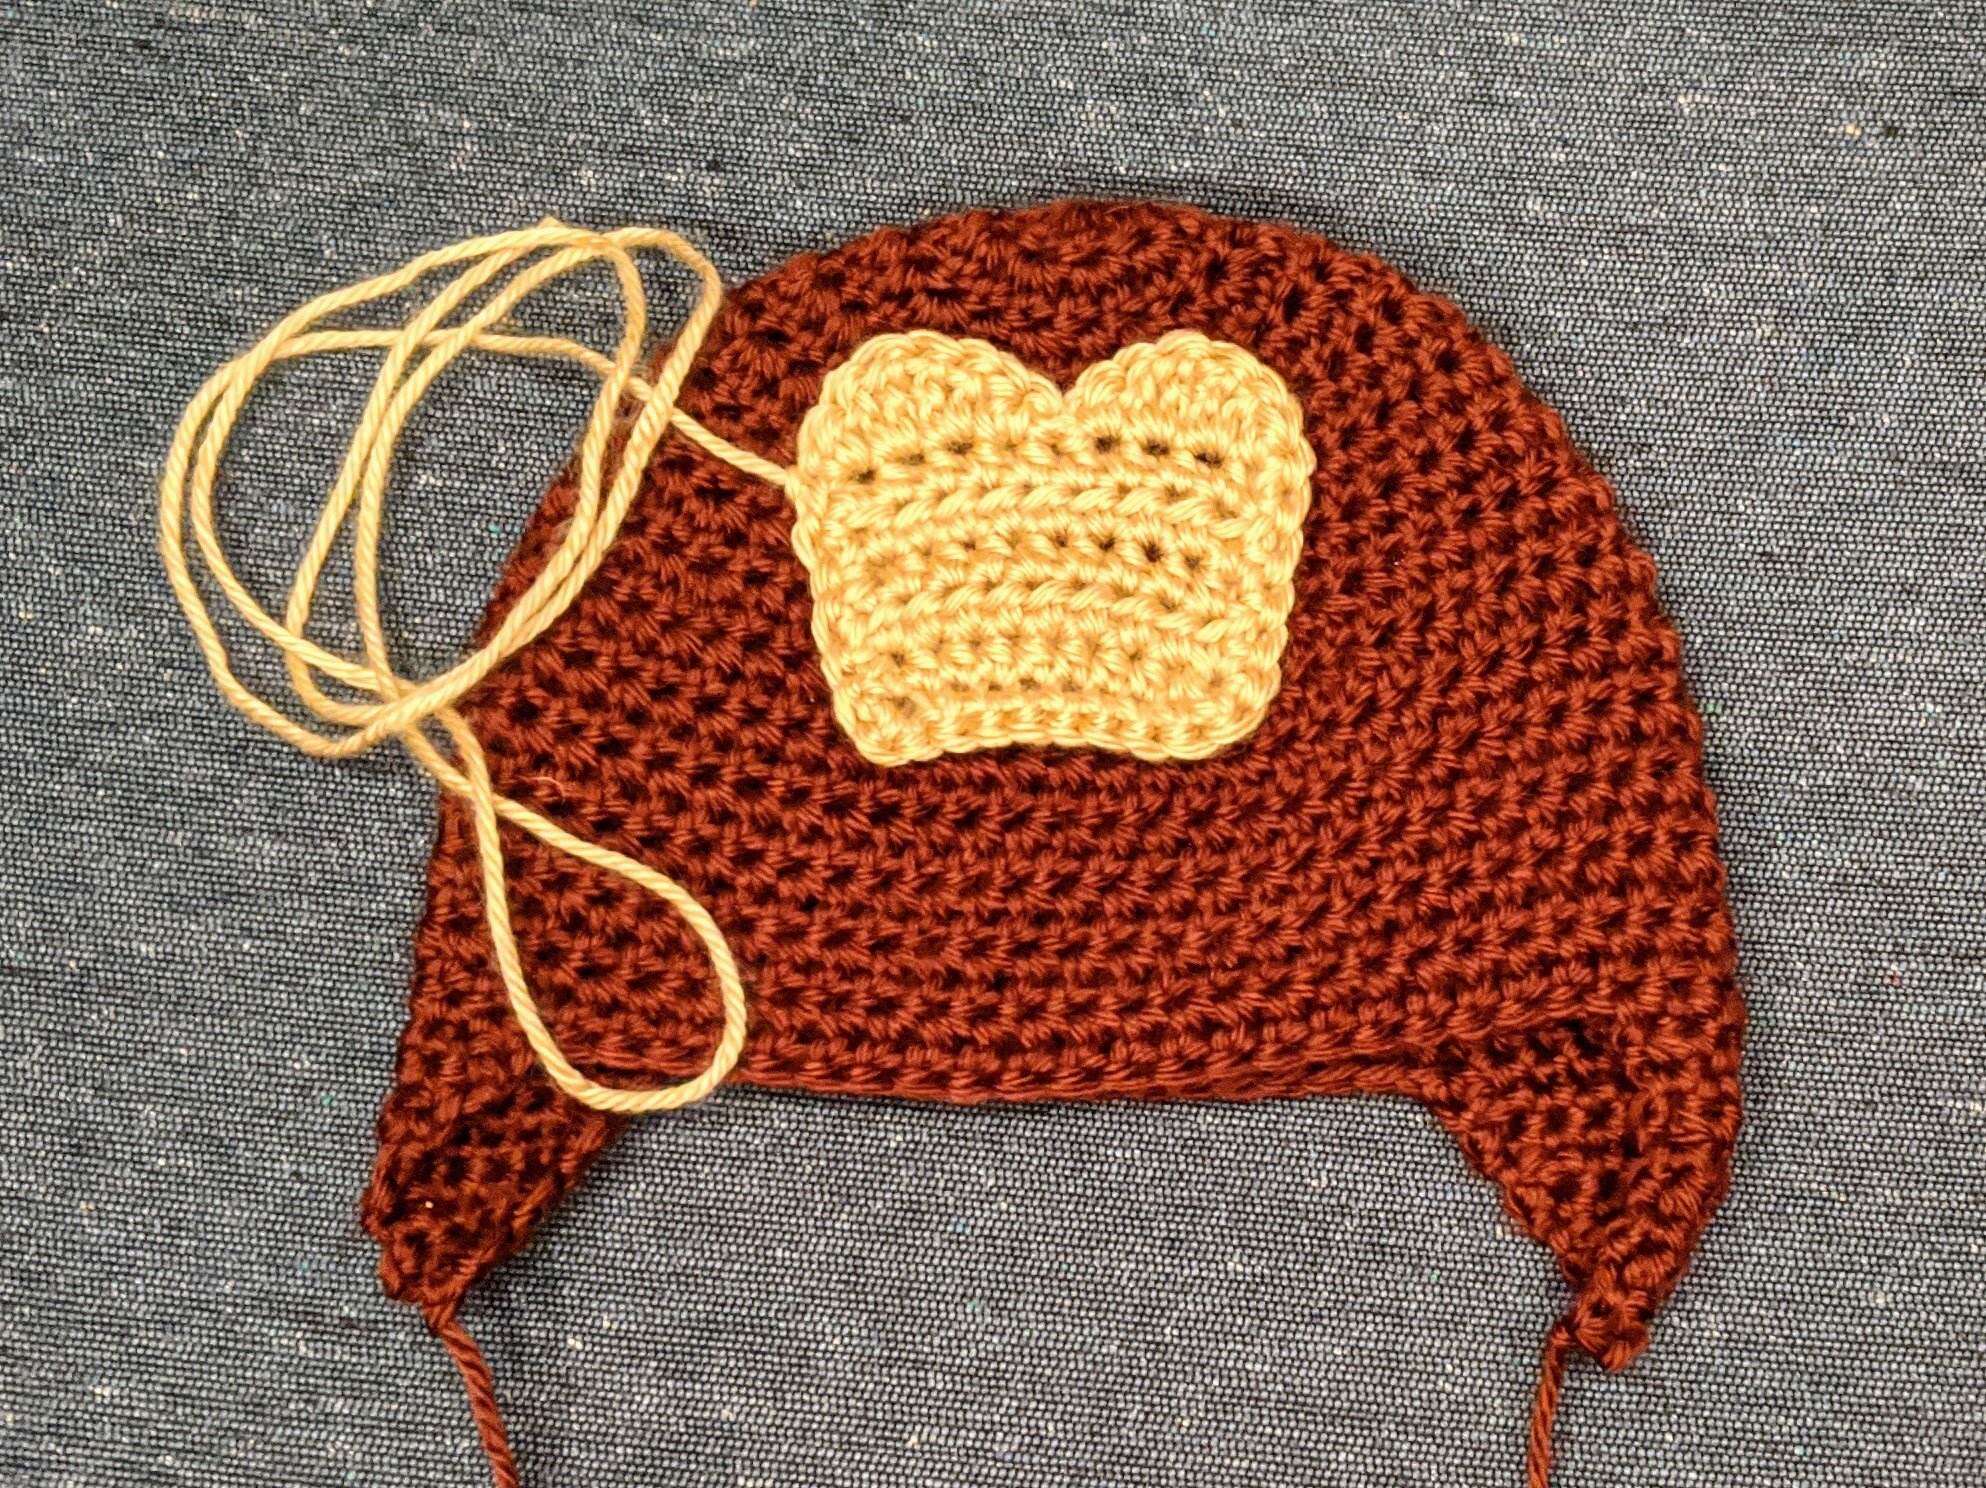
The second earflap will follow the same pattern as the first. To see placement of second earflap, see photo below.
Optional: Accent Trim
If desired, in yarn (B): ch1, then SC around the entire bottom border of the hat including over the edges of the earflaps; at the tips of the earflaps, 2 SC in order to more smoothly round the corners; join; bind off; weave in ends.
Face Applique: Part 1 - Upper Face
Start: In yarn (B), Ch11
Row 1: HDC in 2nd ch from hook, hdc in each st until end (9 HDC total in row), turn
Row 2-5: Ch2, HDC in each st across, turn
Row 6: ch1, *sc then HDC in 1st st, DC then TR in 2nd st, TR then DC in 3rd st, HDC then SC in 4th st*, sl st, repeat from * to * across last 4 st in the row (17 sts)
Finish: Sc in each stitch around, starting by going down the left side of the face, then across the bottom chain stitches, then up the right side of the face with 2 sc in corner stitches. Sl into first stitch of row 6 to finish the round; bind off leaving long tail to stitch face onto hat.
Face Applique: Part 2 - Lower Face
In this portion, you will essentially be creating a small dome in the shape of an oval. To work this portion, we’ll start with a series of chain stitches and then work into both sides of those chain stitches, essentially crocheting in the round in the shape of an oval.
Start: In yarn (B), Ch7
Round 1: 2 dc in first ch from hook, hdc in next 4 chain sts, 2 dc in last ch. Turn and work the bottom side of the chain sts. 2 dc in same ch st you just worked, 4 hdc in bottom side of the next 4 ch sts, 2 dc in bottom of final ch st. Sl into first dc from this round to complete the round. (16 sts in round)
Round 2: ch1, 2 dc in each of next two sts, hdc in next 4 sts, 2 dc in next 4 sts, hdc in next 4 sts, 2 dc in last 2 sts. Sl into first dc from this round to complete the round. (24 sts in round)
Round 3: ch1, hdc, 2hdc, hdc, 2hdc, hdc in next 4 sts, *hdc, 2hdc* repeat from * 3 more times, hdc in next 4 sts, hdc, 2hdc, hdc, 2hdc. Sl into first hdc from this round to complete the round. (32 sts in round)
Round 4: hdc in each st in round. Sl into first hdc from this round to complete the round. Bind off leaving long tail to stitch onto hat.
Finish: Using yarn needle and black yarn, stitch mouth and nose in place. Bind off and weave in ends.
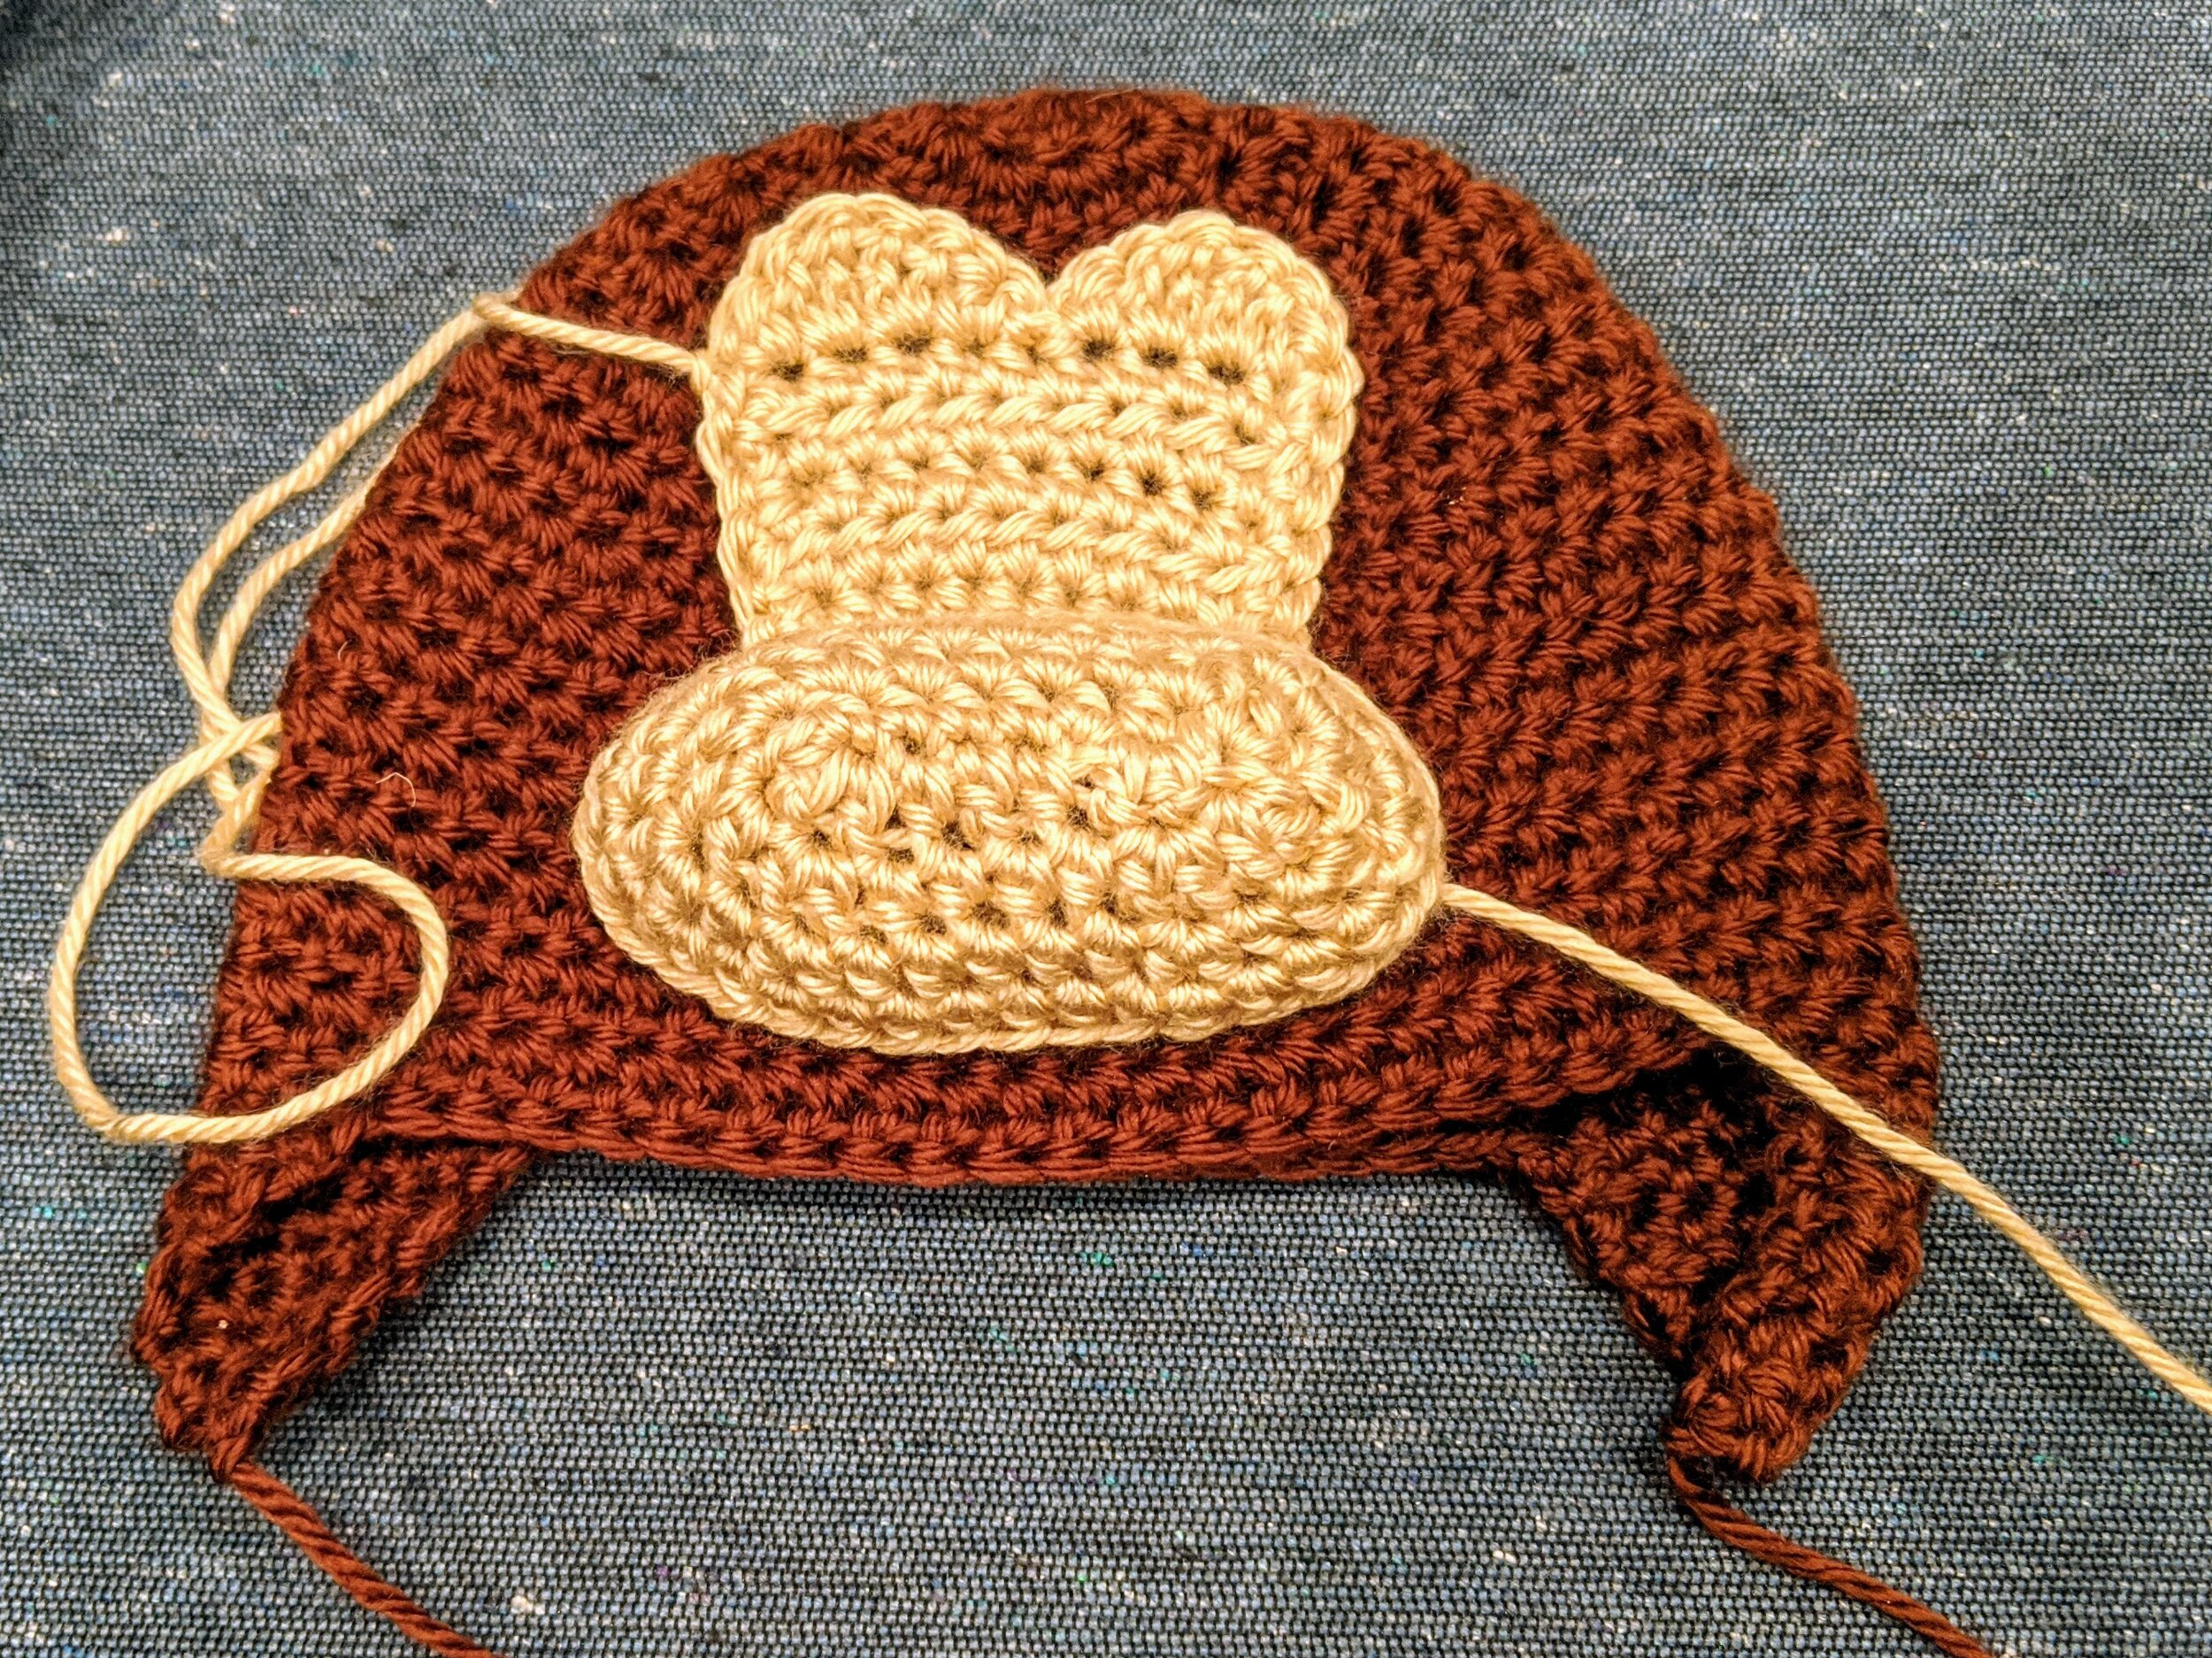
When finished, the lower face should be slightly dome-shaped, which gives the hat it’s 3 dimensional flair.
Eyes
Start: In white yarn (C), Ch 8
Row 1: Hdc in 2nd ch from hook, hdc in each st until end (7 hdc total in row), turn
Row 2-4: Ch2, hdc in each st across, turn
Row 5: ch1, *sc then dc in 1st st, 2 tr in 2nd st, hdc then sc in 3rd st*, sl, repeat from * to * across last 3 st in the row (13 st total)
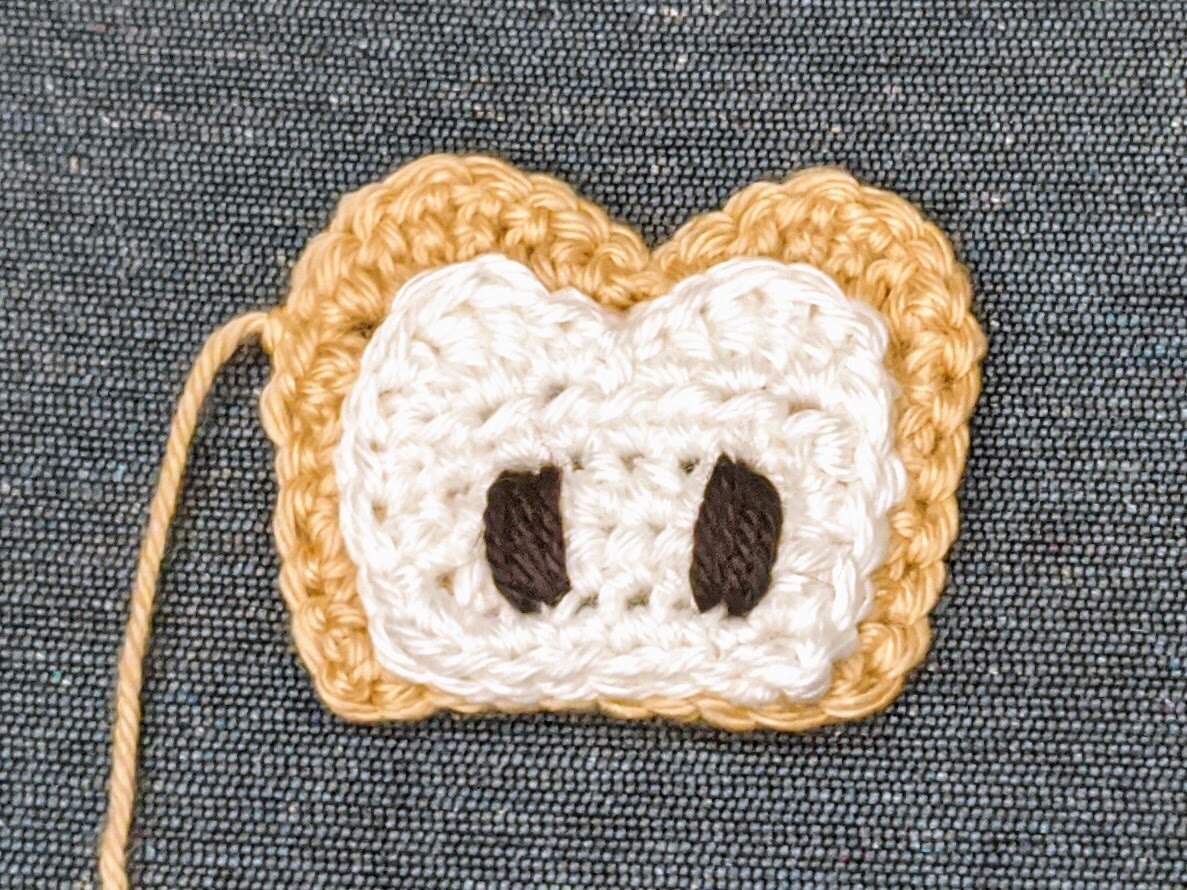
Finish: Sc in each stitch around, starting by going down the left side of the eyes, then across the bottom chain stitches, then up the right side of the eyes with 2 sc in corner stitches. Sl into first stitch of row 5 to finish the round. Bind off leaving long tail to stitch face onto hat. Using yarn needle and black yarn, stitch eyes in place.
Stitch Face in Place
Using the long tail of the white yarn, stitch the eyes to the upper part of the face applique (see image below). Next stitch the entire upper part of the face applique onto the hat. Finally, you will stitch the lower part of the face applique onto the hat. The upper edge of the lower part of the face should touch the bottom of the eyes. As mentioned above, the lower part of the face will be 3D. After you have stitched about 3/4 of the way around the lower part of the face attaching it to the hat, you will stuff the lower part of the face with stuffing or scrap yarn so that it fills in the dome shape and creates the 3D effect. Once you have finished stuffing, continue to sew the last 25% of the lower part of the face onto the hat closing the gap. Bind off and weave in ends.
Ears (make 2)
With yarn (B), Magic ring, 9 HDC in magic ring, join to first HDC, chain 1 (9 HDC)
Round 2: 2 HDC in each around, join to first HDC, chain 1 (18 HDC)
Round 3: switch to yarn (A), *2 HDC in first, HDC in next* repeat around, join to first HDC, chain 1 (27 HDC)
Round 4: SC in each stitch around, join to first SC, bind off, leave long tail to sew ear onto hat (27 HDC)
Lay the hat flat on the table and mark where the hat creases on the sides. Sew the ear onto the hat at the point where the hat creases.
***You may make and sell products from my patterns but if you do I ask that you link back to my post. Please do not copy and post this pattern and claim it as your own, or attempt to sell this pattern. Please do not re-publish photos as your own.


